Showing posts with label spaceship. Show all posts

Saturday, 1 December 2012

Model 2: Texturising Spaceship 2

          I used unwrap uvw on this part so that I could be able to practice that 3d max feature. First, I
selected a particular face or polygon where I want the texture to be put as shown in Figure 1. However, it should be planned properly because sometimes, it doesn't look flat enough to add texture on it. What I mean is that, some parts are too small or complicated.

Figure 1. Unwrap UVW
          After properly selecting all the  faces from the model, I carefully arrange it to fit on the box (Figure 2). I had problems on this because I put it outside the box and then when I saved it, some of the parts are gone.

Figure 2. Unwrap UVW template
         
          The easiest way I tried in texturising my model is by deleting the polygons as shown in Figure 3. As you have noticed, I deleted the polygons and add the images under it and delete the unwanted texture. Isn't it much easier? You can change right away if it doesn't look good on your model.

Figure 3. Delete the pattern and add the texture underneath


          When I finally added it to my model, it looks really weird (Figure 4). I think the image is small or because I used a 750 template which denotes a lower resolution. Anyway, I realise that I shouldn't have change it at the first place because it was like 1000+ but I changed it. So I changed it until I get a good looking texture.

Figure 4. Weird outcome
          The next thing I did is the bottom part of the spaceship. I have this imagination of it will look like it will open with lights like a pizza style as what I've seen on some of the movies I watched. Figure 5 shows the failed attempt I made. It was really ugly! So I manipulate it on Adobe photoshop, add some layer style like outer glow and the outcome is much better as shown in Figure 6. And I was able to somehow bring my imagination alive.

Figure 5. Failed attemp

Figure 6. Adding layer style

          Figure 7 and Figure 8 shows my final texture for my spaceship 2.

Figure 7. Back view

Figure 8. Front view

          Some of the textures used here can also be seen in my Model 1: Texturising Spaceship.

Monday, 26 November 2012

Model 1: Texturising Spaceship

          To start with, I used the Slate Material Editor in texturising my model. The images below are the textures I used:

Figure 1. Texture 1 (WarpZone, 2009)
Figure 2. Texture 2 (WarpZone, 2009)

Figure 3. Texture 3 (cmstudiosmusic)
Figure 4. Texture 4 (svenniemannie, 2008)

          I tried different textures for the body of my model at first and got this result (Figure 5). It really doesn't look good because it looks distorted. I think the image is too small to wrap up all the body of my model. At first, I wanted this model to look "dark" but it didn't work well and decided to stick with lights colours. Apparantly, I thought that my model without texture is much better than adding texture on it. But, I will try.

Figure 5. Trying out different textures

          For my engine, I decided to give it a dark colour (I used Figure 1 texture) because I'll be using light colours for my body. With this technique, I am able to show the body and engines in just one look without thoroughly looking at it.

Figure 6. Engine texture

          The texture I used for some of the small details on my spaceship is the same with the engine but it has a reddish part on it (Figure 2). As you can see on Figure 7, I used a lighter colour for the body. Yes, it does still look distorted because the image was stretched specially on the wings part. Although this happened, for me, it somehow blend with style of the wings and I think it will look okay in the animation because it depicts a forward-moving motion.

Figure 7. Body and Rockets texture
   
          I showed my final result (Figure 8) to a friend who doesn't know about 3D Modelling. He said that it looks like one of the spaceships in Playstation 1. Although it was just "1", I took it as a compliment becuase the fact that it looks like the spaceships in some Playstation 1 games. If you have notice something, I didn't add any texture on the windows of my model, it is becuase I tried adding a glass texture but it didn't go well. So, I decided to keep the original one and when I rendered it (Figure 9) it blends well with the whole textured model.

Figure 8. Final output
Figure 8. Rendered final output


References:

WarpZone, 2009. Space Marine Engine Block: Variation 7. [online] Available at: <http://www.filterforge.com/filters/6953-v7.html> [Accessed 26 November 2012]

WarpZone, 2009. Space Marine Engine Block: Variation 1. [online] Available at: <http://www.filterforge.com/filters/6953-v1.html> [Accessed 26 November 2012]

svenniemannie, 2008. Spaceship Texture. [online] Available at: <http://svenniemannie.deviantart.com/art/Spaceship-Texture-91959740> [Accessed 26 November 2012]

cmstudiosmusic. Metal Textures. [online] Available at: <http://cmstudiosmusic.com/blog/textures/metal-textures> [Accessed 26 November 2012]

Tuesday, 30 October 2012

Model 2: Spaceship 2

          A little bird told me that why not try searching for a tutorial in making a spaceship because I'm stuck again for my next model. So, I decided to do his suggestion. I searched for a video in Youtube and landed on this tutorial (Eugene Ch'ng, 2012).

          By watching the tutorial, I discovered a lot of techniques. The first step is to have a sphere and delete the other half (Figure 1). Just a reminder, the segment of the sphere should be "even" number so that you could divide it by two. To divide it, you can place your sphere in Y axis (pattern the edges as seen in Figure 1, upper-left corner image). This method will make it easier for you to select all the vertices and delete it.
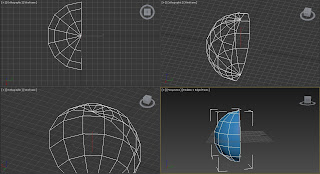
Figure 1. Deleting half of the sphere


           The reason why I deleted half of the sphere is because I will duplicate it with the Mirror tool with Reference option. Why I did not used Copy option? The difference between these two is, Copy option is just copying the element. On the other hand, Reference option is copying the element and if you do some modification on that element, the copied element will modify itself too. So it saves time and make you element sides even. After that, I manipulate some vertices to add shape on my spaceship and added Bevel effect to give details on it (Figure 2).
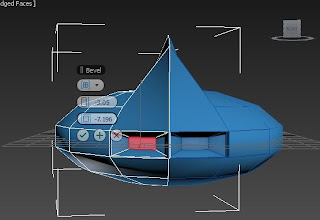
Figure 2. Mirror tool with Reference option and Bevel option


          In order to avoid the curve bottom, I selected the center vertex and all the vertices around the it and then move it upward to achieve a flat bottom look (Figure 3). You can also see that I added wings by using the Extrude option in the polygons.
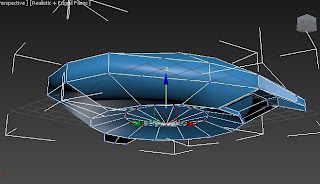
Figure 3. Moving the vertices to add flat bottom look

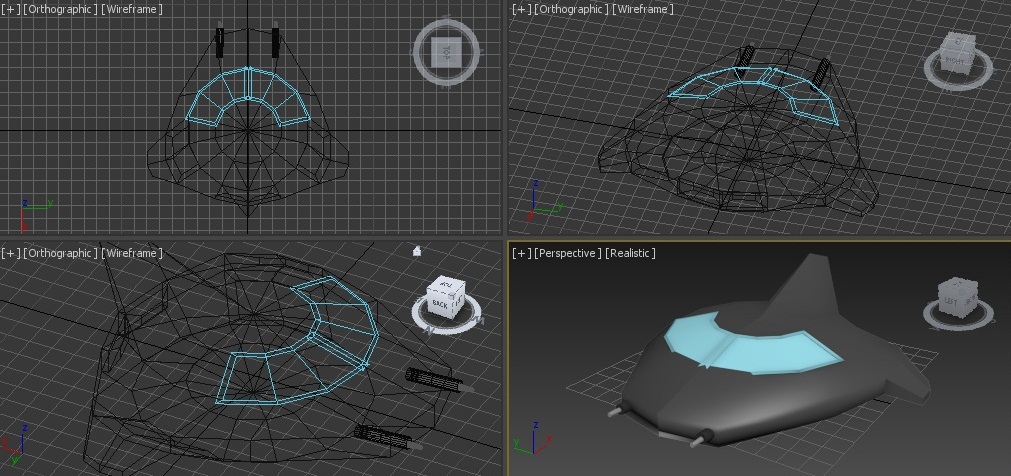
           Another technique I discovered are the Detach and Attach options. I added windows to my spaceship by selecting three polygons next to the polygons near the center vertex and then chose Detach options (Figure 4). With this method, these polygons are now new element. To give a window effect, I added colour on it and duplicated as shown in Figure 5. 
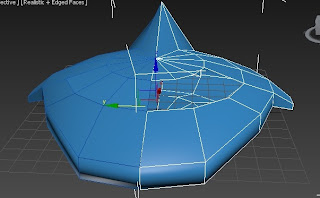
Figure 4.

           I accidentally moved the other half of the spaceship. With the Align tool, problem is solved (Figure 5). After aligning it properly, I combine these elements by using Attach option and Weld all the vertices in the middle to unite the vertices since they are in the middle.
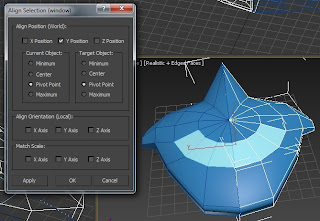
Figure 5. Align Tool

           I changed the colour of the spaceship just like from my first model to give it "like a spaceship effect" and the fact that this colour is common to it.
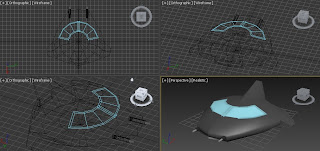
Figure6. Spaceship 2

Total Polys: 446
Total Verts: 385


          A very simple spaceship with few polygons. I guess, with this amount of polygons, this is very good for gaming especially those simple games as well as for Media students. But, I also think that for us, Media students, we should have more details to make this look more attractive to others.

References:

Eugene Ch'ng, 2012. 3D Studio Max Tutorials -Creating a Spaceship. [online] Available at: <http://www.youtube.com/watch?v=txUWtVUSitg> [Accessed 30 October 2012]

Sunday, 21 October 2012

Model 1: Spaceship Part 2 of 2

          From my previous post, I already made wings for my spaceship. I find my spaceship "fat", so I decided to reduce the width of the body element by moving the vertices as shown in Figure 1.

Figure 1. Moving the vertices to shape the body of the spaceship

          As you can see in Figure 2, I added an element in the middle of the body. I was able to get that shape not by extruding but by moving the vertices then added a cylinder. This element will be the window as most of the usual spaceship has.

Figure 2. Shaped by elements by moving the vertices

          I tried the Extrude first in adding some details on the engines but it did not look well. With this kind of design, Bevel is much better as shown in Figure 3.

Figure 3. Added details on the engines

          I also tried to add some details on my spaceship's wings. In this process, I used the Boolean method in deleting the unwanted shape (Figure 4). It is like a scissor cutting a paper to form a shape. Of course, I made used of different element to get the shape that I want.

Figure 4. Boolean option

          After that, I coloured it red the same in my base model. I also changed the colour of my spaceship to make it looks like a spaceship because that is the colour of the most spaceships that I found.

Figure 5. Spaceship

Total Polys: 2, 132
Total Verts: 1, 922

          The number of polygons here are not too much so it is also good for gaming.

Saturday, 20 October 2012

Model 1: Spaceship Part 1 of 2

          It took me a long time to decide what should I do, not until the aircraft tutorial. I decided to start the same way as the tutorial and found a base model (Figure 1).

Figure 1 My base model (Octopus41092)


          The body of my model is from a cylinder shape while the pointed red tip (refer to Figure 1) is from a cone. These elements undergone to a process of rotating and moving as well as aligning. One thing to remember here is to make the important parameters the same as the other such as the Radius and Sides to avoid the mistakes I had before in one of the exercises (compare Figure 3 and 4).

Figure 2. Rotating, moving and aligning the elements

Figure 3. Cone parametersFigure 4. Cylinder parameters
       
          In order for me to get the shape that I need, I used the Scale tool by selecting all the front vertices (Figure 5) and shaped them until it has a small width from the pointed shape (coloured in violet).

Figure 5. Move vertices


          Here, I did not Extrude the wings rather I added a box. Some of the parts of the spaceship's wing are in curve shape. I was able to achieve a curve shape by using the Connect option to add vertices and manipulate it to have a curve side (Figure 6). Another method I thought after doing this is the Boolean tool, maybe it will be much easier and save time instead of what I have done.

Figure 6. Connect option to add vertices for curve shape

          After getting the curve, to save time, I duplicate this element by Mirror tool with Copy option (Figure 7).

Figure 7. Mirror tool

References:

Octopus41092. 3D Model of Spaceship. [online] Available at: <http://www.exchange3d.com/3D%20Model%20of%20Spaceship/prod_5201.html> [Accessed 19 October 2012]