Showing posts with label texture. Show all posts

Monday, 3 December 2012

Model 3: Texturising Spacetank

           On this model, I used both techniques from my previous texturising. First, I test some images that will not look distorted (Figure 1) on a particular polygon if I just put it right away. Though other part are okay, others still look distorted so I decided to use the unwrap uvw.

Figure 1. Distorted images on some polygons

           I did some tricks on this part (Figure 2), I just selected the upper polygons because the side of it will blend with the design that I want.

Figure 2. Chose the upper polygons

          Because I was a bit afraid that the small details will become big if I put it on the model, I decided to just do some magic. The magic that I'm talking about is that, copying the images and just manipulate it to cover up everything. As you can see in Figure 3, I carefully attached very images so that it will look goo and doesn't look like a collage.

Figure 3. Manipulate image in Adobe photoshop


          Moreover, some of the texture I made didn't work well on the model like in Figure 4. Did you noticed it? The line of the texture is against the horizontal line of the design model. So I went back to photoshop again and fixed it by just rotating until it looks okay.

Figure 4. Not aligned properly

          I will be using the rockets on my animation, I decided to group the rockets (Figure 5) so that I can use it properly, not cluttered the time I'll import it to my spacetank to my animation.

Figure 5. Grouping the rockets

           So here is my final texture for my spacetank (Figure 6).

Figure 7. Final texture
       
          If you noticed again something, I didn't add textures on some parts of the model. Why? Because the more I added a texture, the more it looks bad. Maybe because I can't find a better images to blend with the images that I already added.


References:
AaronDesign, 2009. Scratched Steel Texture. [online] Available at: <http://aarondesign.deviantart.com/art/Scratched-Steel-Texture-137545405?q=boost%3Apopular%20steel%20texture&qo=1> [Accessed 3 December 2012 ].

Limited-Vision-Stock, 2011. Metal Texture 3. [online] Available at: <http://limited-vision-stock.deviantart.com/art/Metal-Texture-03-214730347> [Accessed 3 December 2012 ].

enframed, 2005. ulv Metal Plate Texture. [online] Available at: <http://enframed.deviantart.com/art/ulv-Metal-plate-texture-19698128> [Accessed 3 December 2012 ]. 

webtreats, 2009. Webtreats 8 Free Fabulous Seamless Metal Textures 5-1024px. [online] Available at: <http://www.flickr.com/photos/webtreatsetc/4682148161/in/photostream/> [Accessed 3 December 2012 ]. 

Saturday, 1 December 2012

Model 2: Texturising Spaceship 2

          I used unwrap uvw on this part so that I could be able to practice that 3d max feature. First, I
selected a particular face or polygon where I want the texture to be put as shown in Figure 1. However, it should be planned properly because sometimes, it doesn't look flat enough to add texture on it. What I mean is that, some parts are too small or complicated.

Figure 1. Unwrap UVW
          After properly selecting all the  faces from the model, I carefully arrange it to fit on the box (Figure 2). I had problems on this because I put it outside the box and then when I saved it, some of the parts are gone.

Figure 2. Unwrap UVW template
         
          The easiest way I tried in texturising my model is by deleting the polygons as shown in Figure 3. As you have noticed, I deleted the polygons and add the images under it and delete the unwanted texture. Isn't it much easier? You can change right away if it doesn't look good on your model.

Figure 3. Delete the pattern and add the texture underneath


          When I finally added it to my model, it looks really weird (Figure 4). I think the image is small or because I used a 750 template which denotes a lower resolution. Anyway, I realise that I shouldn't have change it at the first place because it was like 1000+ but I changed it. So I changed it until I get a good looking texture.

Figure 4. Weird outcome
          The next thing I did is the bottom part of the spaceship. I have this imagination of it will look like it will open with lights like a pizza style as what I've seen on some of the movies I watched. Figure 5 shows the failed attempt I made. It was really ugly! So I manipulate it on Adobe photoshop, add some layer style like outer glow and the outcome is much better as shown in Figure 6. And I was able to somehow bring my imagination alive.

Figure 5. Failed attemp

Figure 6. Adding layer style

          Figure 7 and Figure 8 shows my final texture for my spaceship 2.

Figure 7. Back view

Figure 8. Front view

          Some of the textures used here can also be seen in my Model 1: Texturising Spaceship.

Monday, 26 November 2012

Model 1: Texturising Spaceship

          To start with, I used the Slate Material Editor in texturising my model. The images below are the textures I used:

Figure 1. Texture 1 (WarpZone, 2009)
Figure 2. Texture 2 (WarpZone, 2009)

Figure 3. Texture 3 (cmstudiosmusic)
Figure 4. Texture 4 (svenniemannie, 2008)

          I tried different textures for the body of my model at first and got this result (Figure 5). It really doesn't look good because it looks distorted. I think the image is too small to wrap up all the body of my model. At first, I wanted this model to look "dark" but it didn't work well and decided to stick with lights colours. Apparantly, I thought that my model without texture is much better than adding texture on it. But, I will try.

Figure 5. Trying out different textures

          For my engine, I decided to give it a dark colour (I used Figure 1 texture) because I'll be using light colours for my body. With this technique, I am able to show the body and engines in just one look without thoroughly looking at it.

Figure 6. Engine texture

          The texture I used for some of the small details on my spaceship is the same with the engine but it has a reddish part on it (Figure 2). As you can see on Figure 7, I used a lighter colour for the body. Yes, it does still look distorted because the image was stretched specially on the wings part. Although this happened, for me, it somehow blend with style of the wings and I think it will look okay in the animation because it depicts a forward-moving motion.

Figure 7. Body and Rockets texture
   
          I showed my final result (Figure 8) to a friend who doesn't know about 3D Modelling. He said that it looks like one of the spaceships in Playstation 1. Although it was just "1", I took it as a compliment becuase the fact that it looks like the spaceships in some Playstation 1 games. If you have notice something, I didn't add any texture on the windows of my model, it is becuase I tried adding a glass texture but it didn't go well. So, I decided to keep the original one and when I rendered it (Figure 9) it blends well with the whole textured model.

Figure 8. Final output
Figure 8. Rendered final output


References:

WarpZone, 2009. Space Marine Engine Block: Variation 7. [online] Available at: <http://www.filterforge.com/filters/6953-v7.html> [Accessed 26 November 2012]

WarpZone, 2009. Space Marine Engine Block: Variation 1. [online] Available at: <http://www.filterforge.com/filters/6953-v1.html> [Accessed 26 November 2012]

svenniemannie, 2008. Spaceship Texture. [online] Available at: <http://svenniemannie.deviantart.com/art/Spaceship-Texture-91959740> [Accessed 26 November 2012]

cmstudiosmusic. Metal Textures. [online] Available at: <http://cmstudiosmusic.com/blog/textures/metal-textures> [Accessed 26 November 2012]

Sunday, 4 November 2012

UVW Wrapping Texture Technique

          This tutorial is all about the UVW wrapping texture technique. You can find the Unwrap UVW in Modifier List. Figure 1 shows the Edit UVW's window where you can detach the polygons/faces (not totally detaching it from the model but it is like making a copy of the polygons/faces you have selected) to add texture.

Figure 1. Edit UVW's window

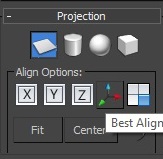
          Selecting the polygons/faces is easy compare to in choosing the right projection (Figure 3). According to the tutorial, we should try the different projection such as the Planar Map, Cylindrical Map, Spherical Map, Box Map and even the XYZ alignment options. So I followed him and tried it to get a proper shape. Unfortunately, some of my selections are not showing a good shape even if I play with the different options.

Figure 2. Cannot find the right form/shape
Figure 3. Projection

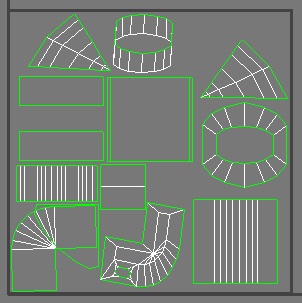
          So, I thought of making some parts of it. Such as from the selection in Figure 3 (red coloured polygons; right image), I divided the it into 3 (left, middle and right) selections. As shown in Figure 4, the pie look on the upper-left hand side image is the left selection, the box with white line in the middle is the middle selection while the red lines is the right selection. With this technique, I was able to lay them all the polygons properly.

Figure 4. Set by set selection

          When I rendered my UVW templates, some of the objects are missing. Why? Have you notice something in Figure 4, my objects are outside the box with checkered background. This is when I realised that I made a mistake already. To overcome this problem, I selected all the objects and scale them down to fit in the box with checkered background (Figure 5). After fixing the size and position, my template is ready (Figure 6) for rendering.

Figure 5. Scale down to fit in the box with checked background

Figure 6. Ready for render

          I used Adobe Photoshop to add colours to the objects as shown in Figure 7.

Figure 7. Adding colours in Adobe Photoshop

          Unfortunately, when I added the image to 3D max, it wasn't that good because the lines are visible. So next time, I should also include the lines in designing the polygons.

Figure 8. Final output